Enrolling in Classes
 To enroll in classes, the quickest and easiest solution to build you schedule all at once is to search for classes and add desired ones to the Schedule Builder. The Schedule Builder checks all sections for selected courses and picks sections that will fit within your weekly schedule. Once a schedule has been built, you also have the ability to add/drop/swap those classes if desired.
If you have already enrolled the majority of your schedule but want to search for and enroll in just a single additional course, using the Advanced Class Search and the Shopping Cart is the best method.
Enrollment Using Schedule Builder (Recommended)
- Click on the Enrollment section in the left-hand sidebar of your Student Dashboard.
- Click Schedule Builder.
- Click the Continue button. You can also check the Skip this message in the future option to hide the introductory message.
- There will be multiple academic terms to choose from. In the Term drop-down menu at the top of the page, select the specific term you would like to enroll in.
- Fill out the search fields with your desired course information. The Start Date and End Date fields can be left blank to search the entire term. You can also specify time you are unavailable and the minimum and maximum amount of break time you would like between classes. The Course Attribute and Couse Attribute Value fields can be used to search for courses that fulfill undergraduate general education curriculum requirements.
- You can designate days and times that you might not be available for class; practice, work, meetings. To designate this unavailable time, Title your unavailability, choose the times (7:00 am -10:00 pm), and day(s) of the week you are not available and click Apply. You can have more than one time unavailable. If classes are in conflict with your unavailable time, you will receive an Error beside that class when you build your schedule.
- NOTE: The more restrictions you put on your time, the fewer schedule choices you will have to choose from.
- In the Course Selection section, select the course Subject and Catalog Number in the drop-down menus. Also select a Course Topic from the drop-down menu, if prompted.
NOTE: There is a maximum of seven (7) courses you can select at one time to use in Schedule Builder. - Click Add Course.
- Repeat steps 4-7 for all of the classes you would like to include in the Schedule Builder. If desired, you can click the Select Sections button to the right of a selected course in your list to select specific sections to include in the build process.
 When complete, click Build Schedule. You will then be presented with schedule options. Scroll between the options using the page numbers and/or arrows at the top of the schedule.
- You can click the Heart icon to set this as a favorite schedule. You can also click the Compare button to the right of the Heart to select two or more schedules to compare. You will be presented with a schedule where you can see each course as it appears with one another. You can choose a schedule, move it into your Shopping Cart and Enroll.
- If you are already satisfied with the schedule, click the Enroll button.
- In the list that appears, check the boxes next to the classes you would like to enroll in.
- You can now either Add to Cart to enroll at a later time or click Enroll to immediately enroll in the course(s).
- If a course has a waitlist option, you will be prompted to select each class and then check the Waitlist if class is full option, then click Save.
- Once you have selected your enrollment options for each class listed, click Enroll. If there are seats available, no prior departmental consent required, and no holds on your account, you will then be enrolled in the course(s). You will receive a brief notification window in the bottom-right of the screen.
- To confirm your enrollment, you can either go to Schedule in the left-hand sidebar and browse to a date during the enrolled term, or you can click the Academic section in the left-hand sidebar and select Course List. Once in the Course List, you can filter by Planned courses to view enrolled classes in the future.
If there are empty seats in the class and no prior departmental consent is required, you will receive a confirmation of enrollment.
View the following videos for more tips using Schedule Builder:
Enrollment Using Shopping Cart (Single/Specific Classes)
- Click on the Enrollment section in the left-hand sidebar of your Student Dashboard.
- Click Shopping Cart.
- To begin adding classes to your cart, click Add Class. You will be presented with the following options:
- Advanced Class Search: Allows detailed searching for courses and sections.
- Schedule Builder: Directs you to the Schedule Builder to select classes and have a schedule built for you.
- Add by class number: Allows you to enroll in a specific course section based on its class number in the course catalog.
- If using Advanced Class Search, click on the result you would like to add to your cart.
- To add to your cart, click Add to Cart. To immediately enroll in the course, click the Enroll button.
- When done adding classes, you can return to the cart by clicking the Enrollment section of the left-hand sidebar, then clicking Shopping Cart.
- Within your cart, you can save selections to come back to later, delete selected classes, or click Enroll to begin the enrollment process for the courses in your cart.
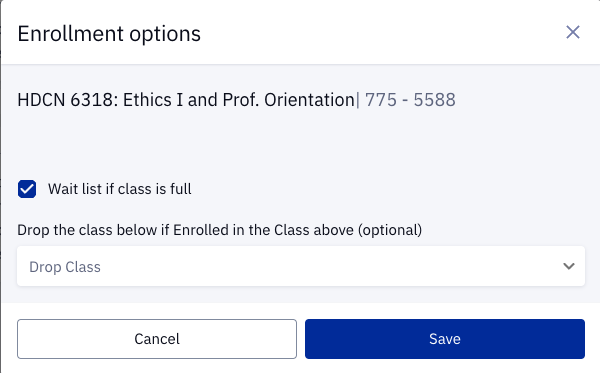
Edit Enrollment Options Using Shopping Cart

You can edit the enrollment options for classes in your shopping cart by clicking on the 3 dots and then clicking Edit. The Enrollment Options pop-up window will appear where you can check the Wait list if class is full option and select a class to drop if you’re enrolled in the class you are waitlisting. Click Save to save your options.
Dropping Class
- Click on the Enrollment section in the left-hand sidebar of your Student Dashboard.
- Click Drop Classes.
- There will be multiple academic terms to choose from. Select the appropriate term in the Term drop-down menu.
- Check the box to the far right of the line item for the course(s) you would like to drop.
- Click Drop in the top-right.
- You will be presented with a confirmation. Click Cancel to back out or Drop to continue and drop the course.
Swapping Class
- Click on the Enrollment section in the left-hand sidebar of your Student Dashboard.
- Click Swap Classes.
- In the list that appears, click the Swap This Class button to the right of the course you wish to swap.
- There are multiple options to find a class to swap with:
- With class from Search: Takes you to the Advanced Class Search to find a course. After entering search terms and viewing results, click the Swap button on the course you would like to swap for.
- With class from Shopping Cart: Takes you to your Shopping Cart. Click Swap on the course you would like to swap to.
- With class from Class Number: If you know the exact class number of the class you want to swap to, enter it with this option.
- Click Swap on the desired class from your search results/Shopping Cart. At this point you will be prompted to select lab/lecture sections and waitlist options, if applicable.
NOTE: If you are added to the waitlist for a class you want to swap to, you will not be dropped from your original course until you are moved off of the waitlist for the new course. - After making section/waitlist selections, click Continue and Save when prompted.
- You will be presented with a confirmation page with info on the classes being swapped. If all appears correct, click Confirm.
Waitlisting a Course
If a class is full when you attempt to enroll, you have the option of joining the waitlist. Please note, not all sections will have the Waitlist option, because not all sections choose to use the my.SMU waitlist. If there is no waitlist option available, then you can contact the department with any questions about enrolling in the section.
You can now add yourself to a section waitlist, even if you are enrolled in another conflicting class or an alternate section of the same class. This will allow you to have a backup class already enrolled in case you are not moved off of the waitlist for a preferred section. In order to do this, you must utilize the SWAP function whenever adding yourself to the waitlist.
You can verify if you have successfully utilized the SWAP function (drop if enrolled), by navigating to the Drop Classes page. In the Enrollment section in the left-hand sidebar of your Student Dashboard, click Drop Classes.
If you utilized the SWAP function (drop if enrolled), the class that will be dropped if you are successfully enrolled from the waitlist will have the noted red icon under the Status column.

Hovering over this icon will show the class number of the waitlist section.
If you did not use the SWAP function, no information about the Drop if Enrolled in section will appear on the Drop Classes page.
Joining the Waitlist
- Follow steps 1-7 for Enrolling in Classes with Schedule Builder or steps 1-4 in Enrollment Using Shopping Cart.
- If a course has a waitlist option, you will be prompted to select each class and then check the Waitlist if class is full option, then click Save.
- Continue the enrollment process as usual. You will be added to the waitlist automatically if the class has no available seats.
Viewing Waitlists
To view the waitlists you are a member of, click on the Enrollment section in your Dashboard sidebar, and select View Wait List.
When viewing waitlists, remember that the page will display how many seats in the waitlist are open. For example, 4/10 signifies that four seats are available on the waitlist for that course.
For more information, please refer to the Waitlist Guidelines from the Registrar's office.
Enrollment Date Information
To view details on enrollment dates and deadlines, select the Enrollment Dates link in the Enrollment section of the Dashboard sidebar. Select a term and expand to get more information regarding enrollment appointments, open enrollment dates, and the last day to enroll for the term.
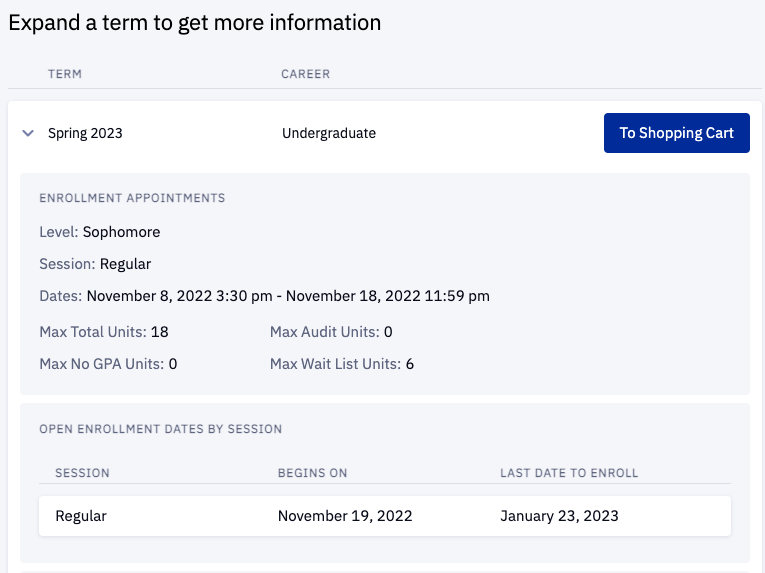
Term enrollment limits are displayed below the open enrollment dates. Enrollment limits vary by term
