
Digital Tools to Foster Discussion, Engagement in Hybrid and Virtual Classrooms
Throughout the past year, faculty have experimented real time with various methods to retain high-level engagement in these learning spaces, whether teaching in the hybrid model, hyflex, or fully virtual classrooms. This has brought challenges both to the teacher and the student, particularly in classrooms with high levels of discussion or engagement. In our research pod, the specific challenges included language learning, lecture engagement, and graduate-level discussion groups, both full classroom and breakout spaces.
In this resource guide, you will find a collection of software, plug-ins and digital platforms with classroom applications. We have outlined where to acquire these tools, how to use these platforms, as well as shared the specific, anecdotal uses in our classrooms. We hope this is helpful and would be happy to answer any questions.
What is this tech tool?
Gather Town is a spatial interactive video software. It allows students to move around and form groups in a manner similar to what they would do in the classroom by using an avatar. It works through the web and does not require a download.
How is it being used here?
Background and context: I have found this platform to be helpful in my classes. For example, I have used it for study groups or activities where students can circulate. In one class, we met on this platform almost exclusively as students expressed a preference for it. We would gather in one fixed meeting spot and then students could break into group activities. It is easy to have students move around as they wish––something that is not possible with Zoom break-out rooms. You can use it for free for classes with under 25 participants. There are also white boards available that students can collaborate on.
Sample Activities: For one of my classes, students completed a project in which they were exploring six central themes. For this class, I put the “themes” in text in different corners of the space, allowing students to circulate freely between the different corners of the classroom to engage in discussions pertaining to the corresponding theme. Gather Town has limited some of these features further in their free version since the fall semester, but I believe certain classroom set ups on Gather Town would still enable this with the “Build” tool.
Learning outcomes and/or benefits: There are several benefits to Gather Town over Zoom. First, students can always come and go from a designated space even when the instructor is not in it (though you can always change the password if you do not want them to be able to enter). This means that it can be a useful space for studying or collaborations. For example, after hosting a study session, I can log off and students can remain and study and/or come and go from the space as they wish, much as they could an actual study room. Second, students get to pick avatars and the platform can add a bit of novelty or “gamification” to online courses. I found that it did help student engagement and gave students a sense of agency, especially since they could move their avatars around and navigate the space themselves. Gather Town can be used to facilitate group activities in a manner more similar to the classroom than Zoom allows for. I have found that when students have questions, they move their avatars to find me (despite there also being a chat and a hand raise button!). It just points to the other ways that students can interact that more closely mirror the classroom experience.
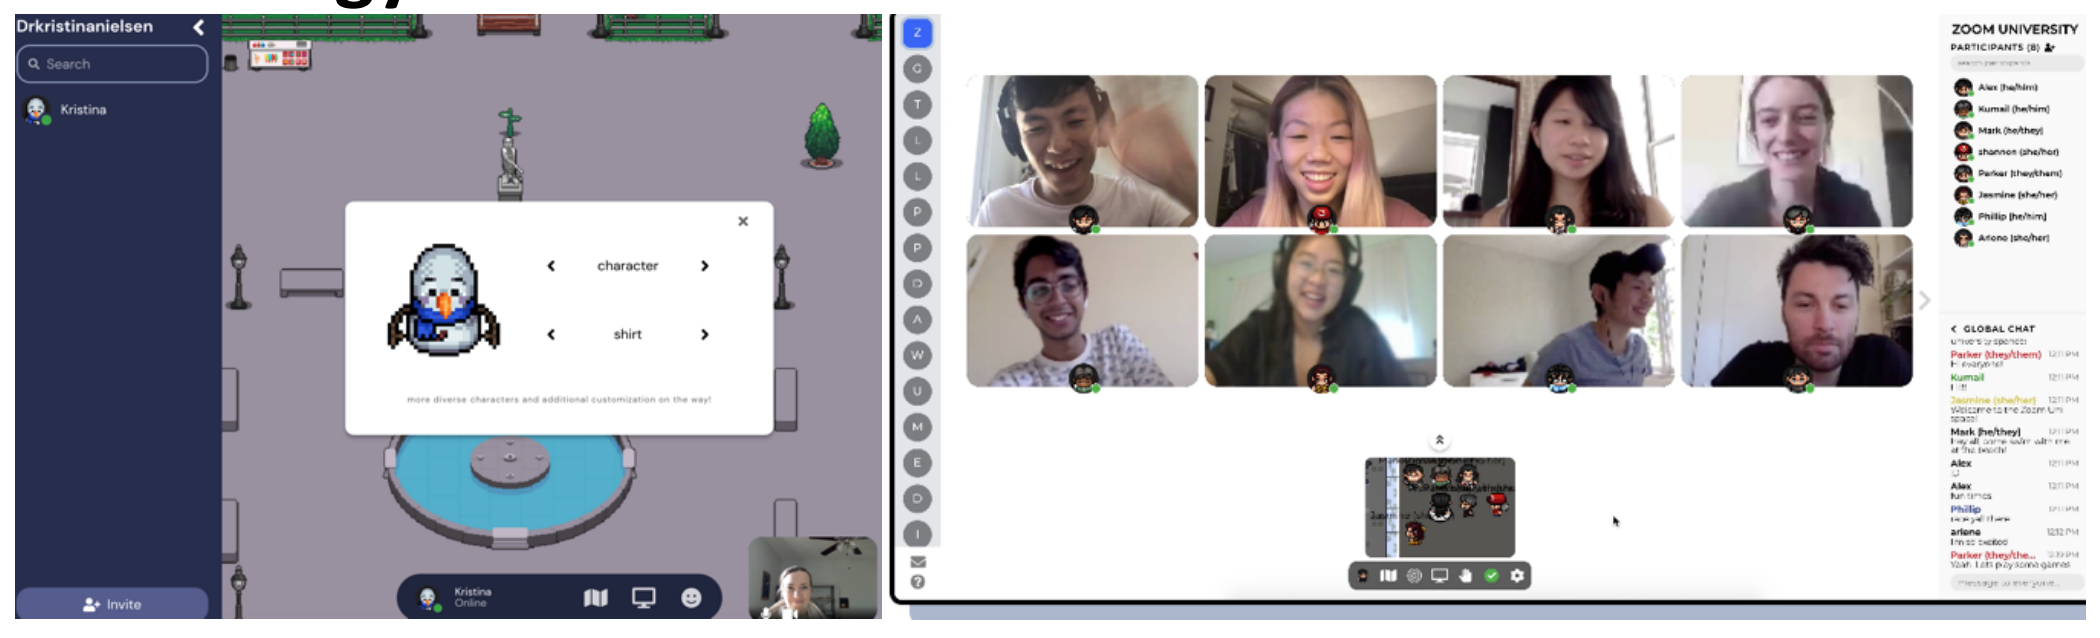
Demonstration: Below is one of the rooms that I used with my class in the fall. As you will notice, on the left-hand side, you can see the people in the room. On the bottom right there is the video icon (red for off/mute). There are also screen sharing capabilities, though these are not as good as those in Zoom and do not have “share audio” settings. There is also a useful chat function that allows you to communicate with everyone in the space, or just those in close proximity to you, or any single student within the space. For a demonstration video see:
How can I get it?
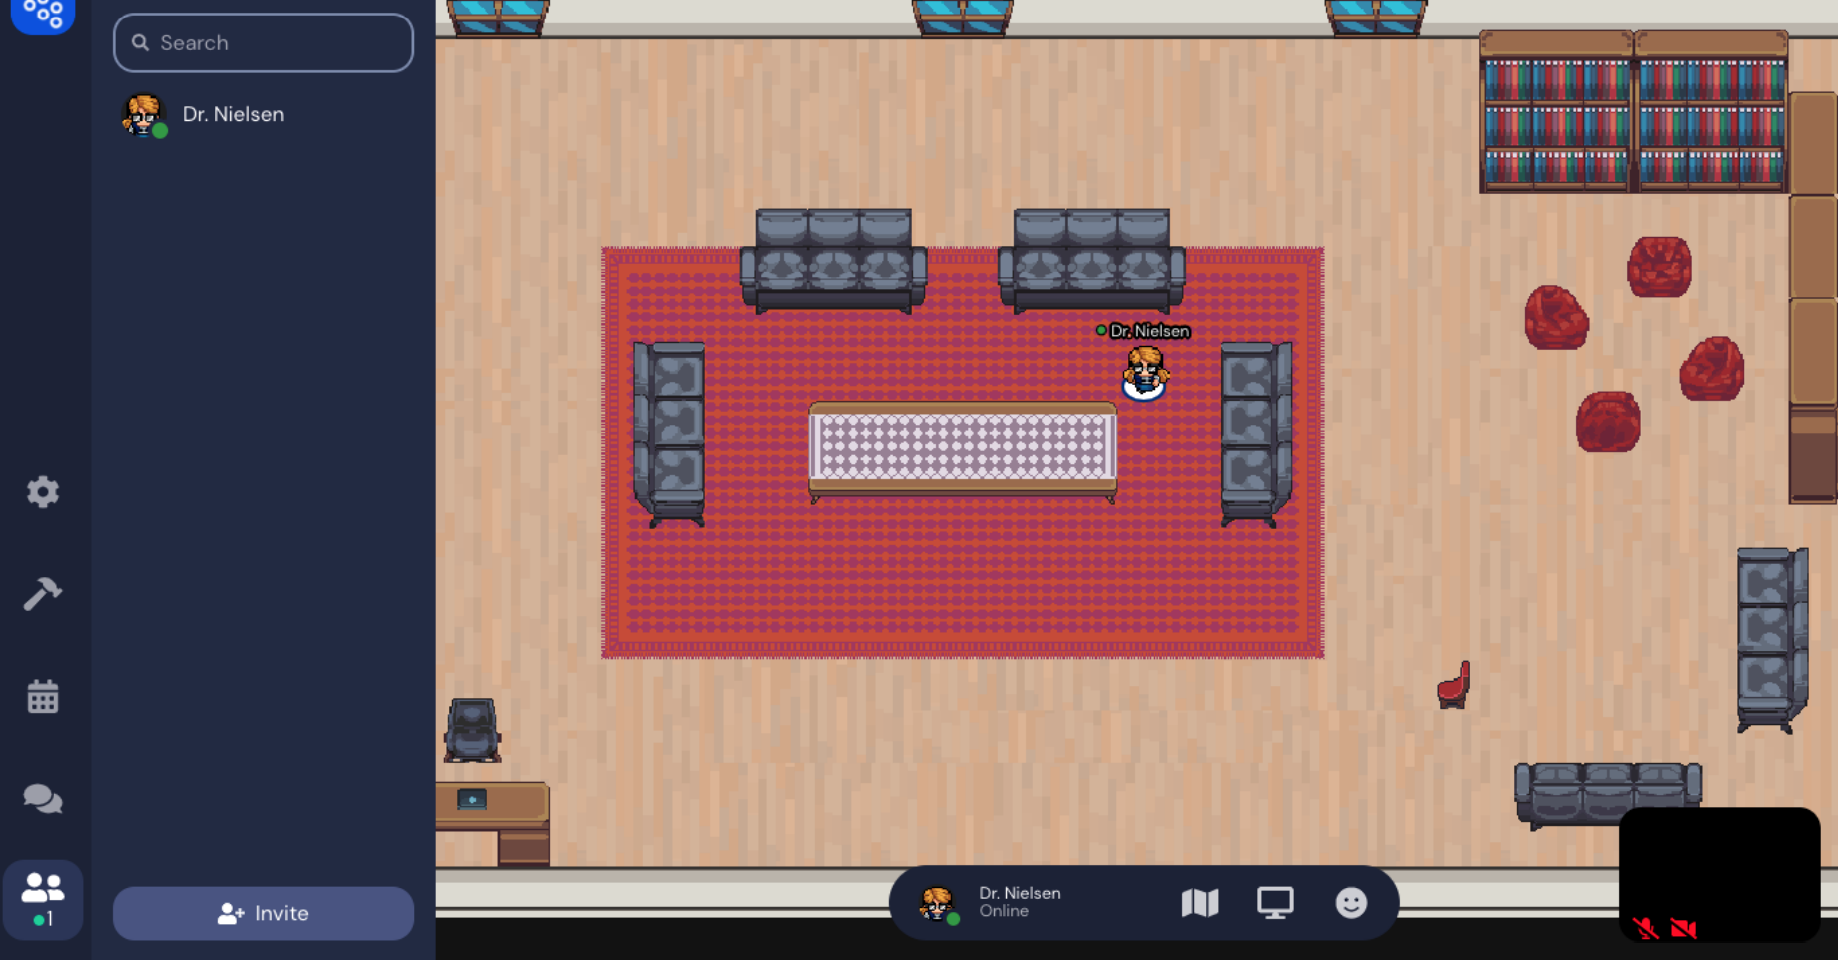
To create your own Gather Town space to host up to 25 people for free, go to https://gather.town/private. Add your name and a password, and then you can select a map of your choice. You can find this “library” room under the “Legacy” tab. You can also customize your own map if you wish to.
What is this tech tool?
Adobe Spark is in the Adobe suite and provides a means to make visual stories or presentations efficiently in a way that is visually compelling and relatively simple. It is web-based and does not require a download.
How is it being used here?
Background and context: I used Adobe Spark to create several introductory videos for my course. There are several advantages to using it over PowerPoint. For example, it is very easy to change the Spark video from semester to semester as you can simply re-record the seconds for the slides that need to be changed and then Spark edits them together again when you hit the “download button.” Another advantage is that Adobe Spark can easily be adapted for collaborative projects. Invitations can be sent out to make projects collaborative. This could easily be used for collaborative projects that could be well polished and easily coordinated across distance.
Heads up: Make sure that you don’t clip yourself at the beginning or end when recording audio, so allow yourself an extra second on either end. Also be sure to check your audio levels when recording anything new in relation to the old to make sure that the volume doesn’t change significantly between sections.
Sample Activity: Students could be tasked with creating a five-minute video in pairs to introduce a subject. To do so, they would need to first outline their presentation and plan what materials to include in how many slides (for 5 minutes, it would be about 20 slides at 15 seconds per slide tops). Since students record the audio with each slide, it is easy to rearrange the slides and change the presentation structure as needed.
Learning outcomes and/or benefits:
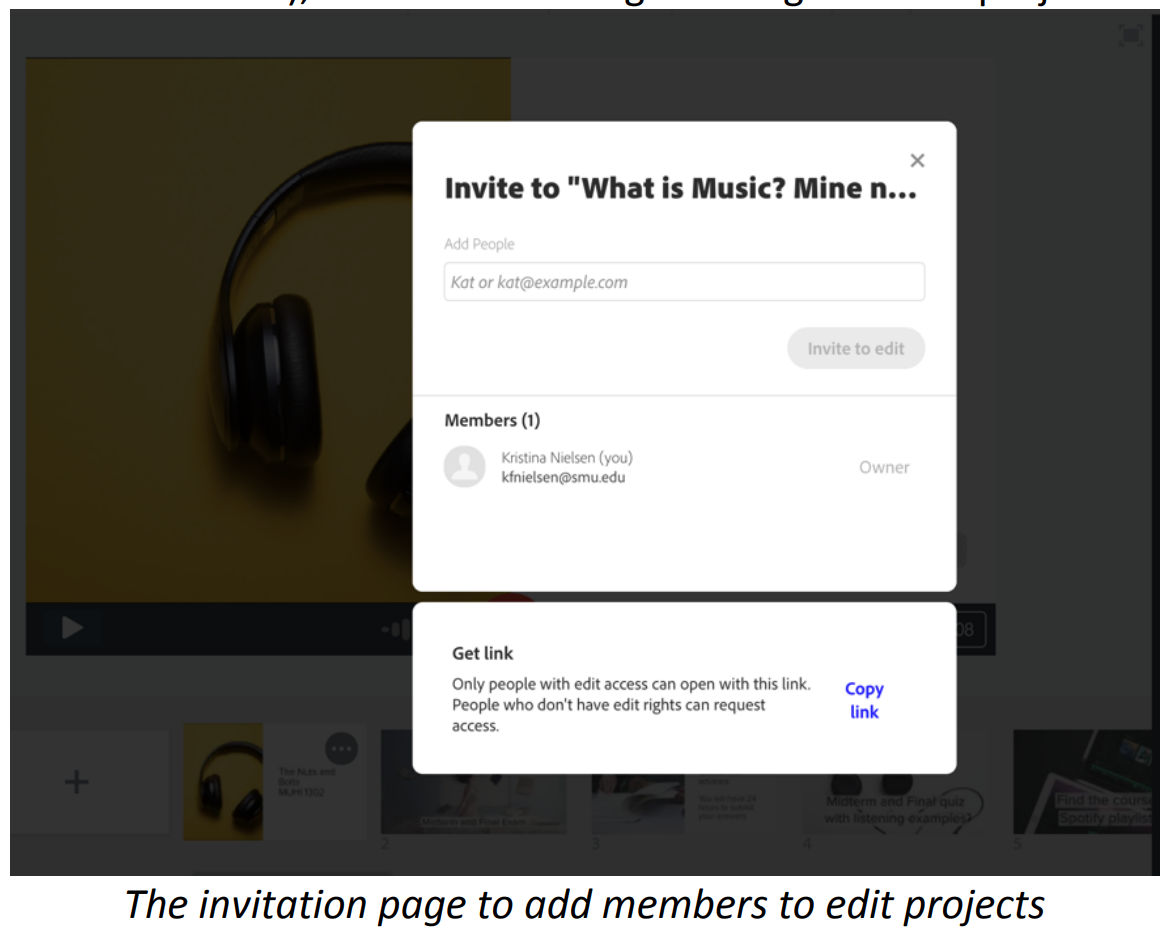
As a standard part of the Adobe suite, it is no doubt a useful tool for students to know and familiarize themselves with. With using the invitation feature, it also gives a chance for collaboration that can still be divided up among students. It provides a forum for group presentations that can be a welcome alternative to PowerPoint and where there can be a clear responsibility and “voice” for each student present (as they can record audio for different slides), while still creating one single shared project.
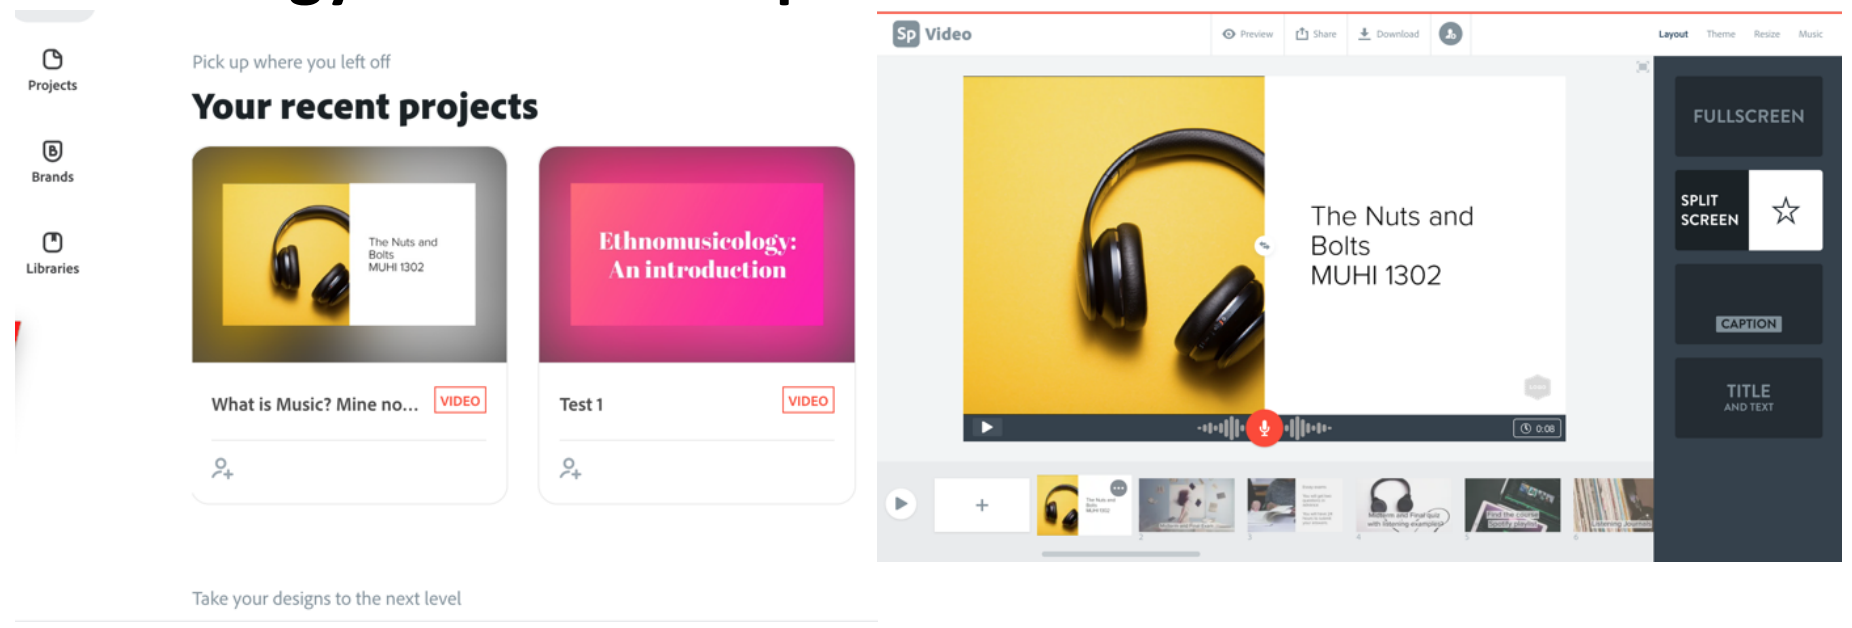
Demonstration: To see an example of a video created with Adobe Spark, see the following link for my “Nuts and Bolts” syllabus video.
As I mentioned above, I have found it to be a good medium for the online syllabus video since I can easily just trade out a few seconds to customize the video to the new semester and then redownload and upload the new video for the new semester. If you upload the video to Panopto (or have students upload the videos to Panopto if they completed a project), it will add the captions making them accessible to all students.
How can I get it?
If you go to https://spark.adobe.com/, you will be asked to log in. Use your SMU credentials. From here, your videos will be archived online and you can return to them to edit them as you wish to.
What is this tech tool?
Poll Everywhere is a polling app sponsored by SMU. It can be used to survey student opinions but also in learning activities
How is it being used here?
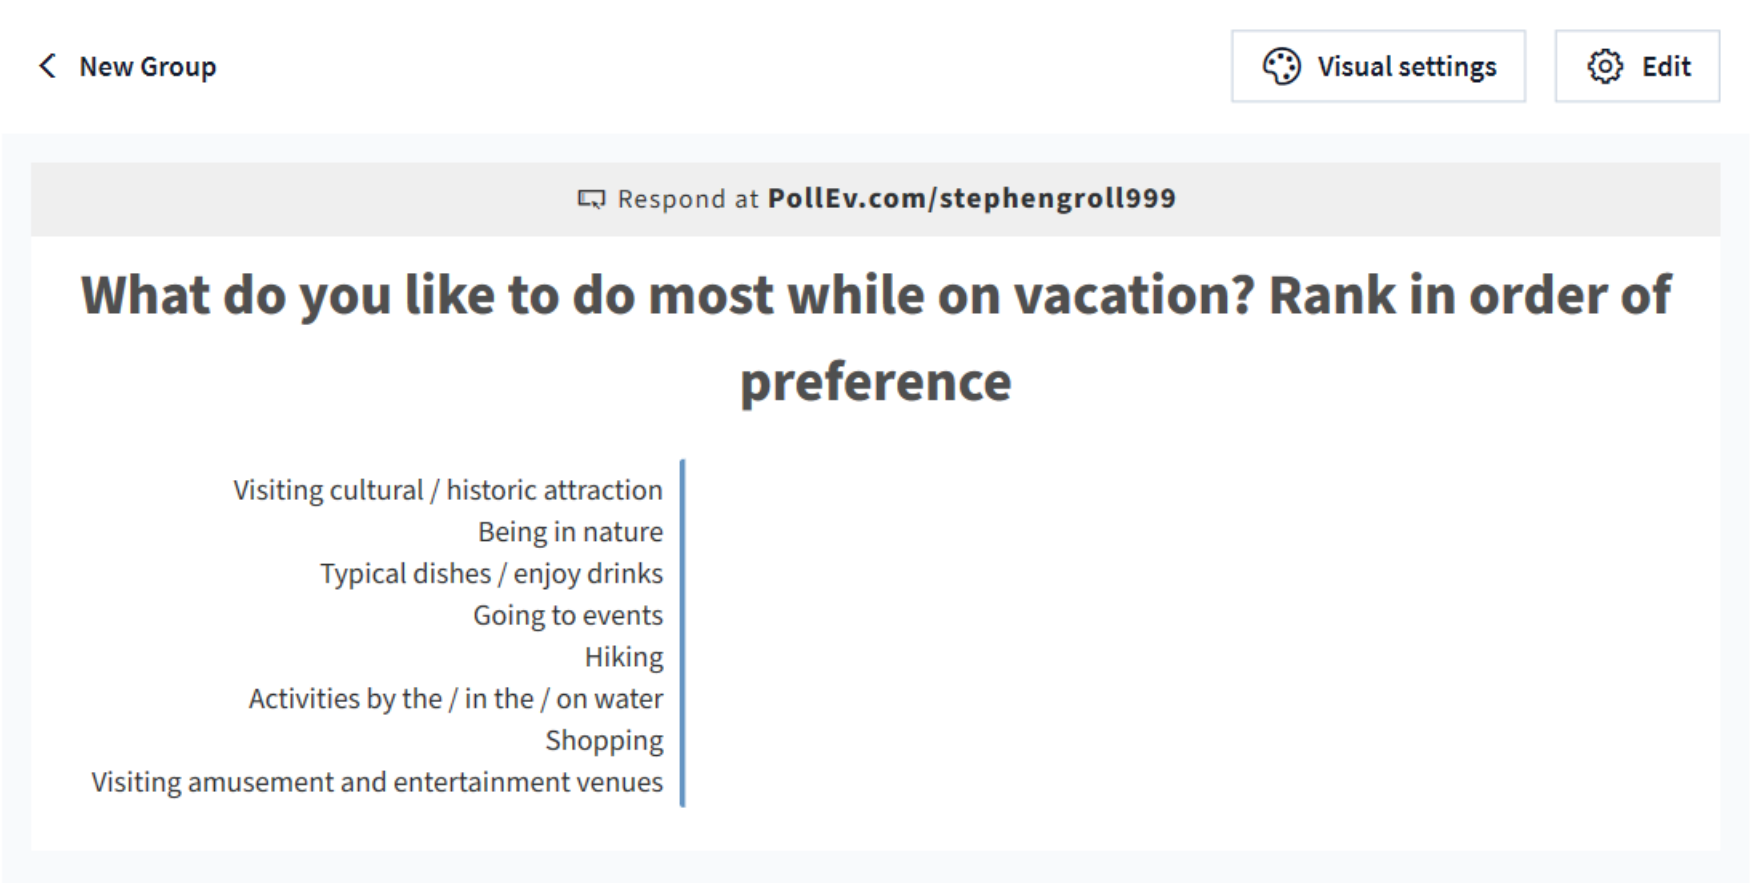
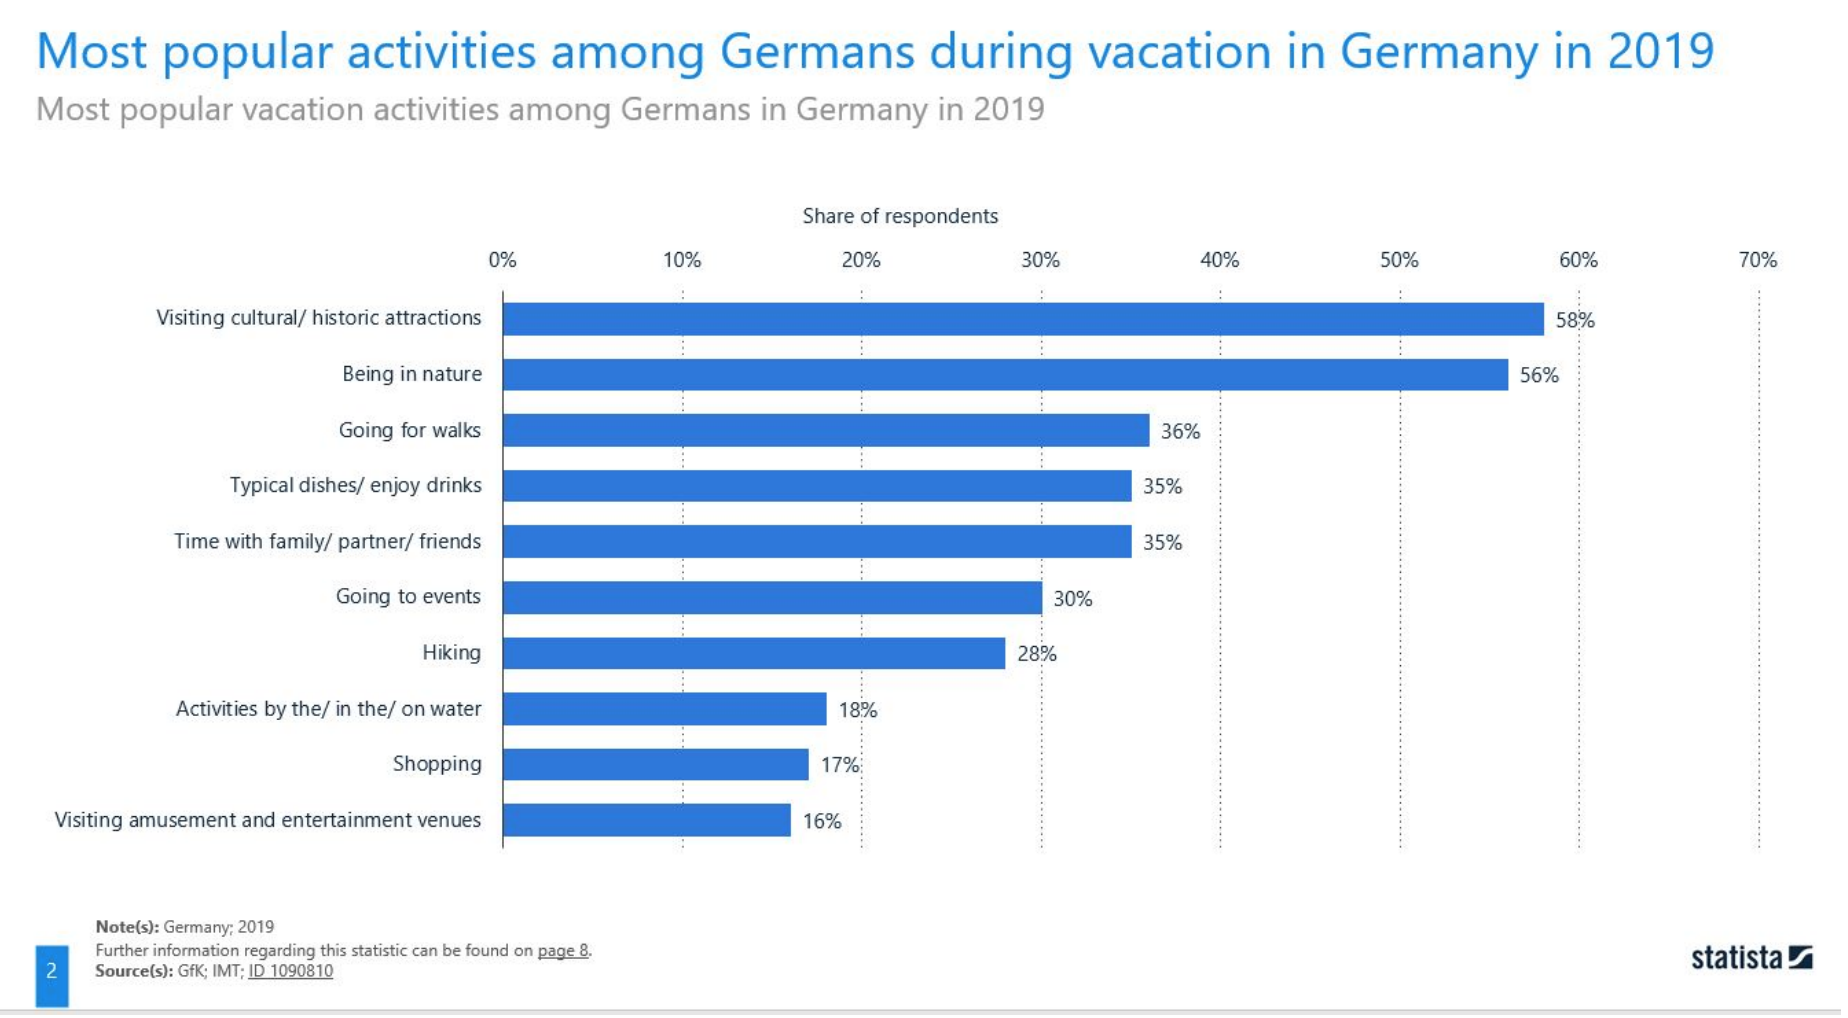
Background and context: I use this type of polling in my German classes as a way to prepare them for interpreting statistical data on German society and culture. The idea is to survey the class about a topic and then see how Germans respond to the same question. In this case, the question was about preferred vacation activities as part of a chapter on travel and leisure. Students take the survey, then compare and contrast their results to those of the German respondents.
Learning outcomes: Students express preferences as to vacation activities and compare their preferences to those of Germans. Students discern differences between Germans and Americans within the cultural perspectives that underlie specific leisure activities.
Demonstration: The poll everywhere activity is attached to a power point presentation. The students take the poll and the results appear on the presentation slide. Here are the steps I took to create the activity:
- I signed up for an account at polleverywhere.com and created the poll there.
- I inserted poll everywhere as an “add-in” for my powerpoint program (insert/Get Add-ins/search: Poll everywhere)
- I activated the poll and presented the powerpoint to the class: they accessed the poll at my polling site: Pollev.com/stephengroll999
- The results showed in real time on the powerpoint presentation
The students then interpreted a second slide derived from the statistics database “Statista”.
The slides below show the poll everywhere activity followed by an image of a graph found on Statista. Ordinarily, this activity would be in German, but for the purposes of this demonstration, I have provided an English language version.
How can I get it?
Polleverywhere.com Dedman College has a subscription to PollEverywhere. See your Academic Technology Service Director about how to sign up for an account.
What is this tech tool?
Flipgrid is an app that allows you and your students to make short videos and to share them in a similar fashion to a forum discussion board. It thus can be used for asynchronous discussions but ones that involve oral communication and the opportunity for participants to see each other.
How is it being used here?
For language classes, Flipgrid is a great tool for practicing speaking. In this demonstration, I have students presenting information.
Background and Context. This example shows how Flipgrid can be applied for a beginning German class. As students have quite limited speaking ability at this point, they are restricted to fairly simple topics. Here, I have them talking about clothing. In order to provide a more authentic situation, I have asked them to simulate a Youtube video that follows the popular topic of a “clothing haul,” where individuals describe and demonstrate clothing items that they have recently purchased.
Learning outcomes:
- Presentational speaking: students can present information on both very familiar and everyday topics using a variety of practiced or memorized words, phrases, and simple sentences through spoken language
- Students identify and describe clothing items in German
Demonstration
1. Students first watch a movie on Youtube that demonstrates a German “Kleiderhaul”:
2. Questions:
Where did that man go shopping? What size are the pants? How much do these clothes cost? The shorts? The jean jacket with the black hood? The tank top?
Thereafter, they create their own flipgrid version of a Kleiderhaul.
Here is an example:
3. We watch each other’s videos in class.
What is this tech tool?
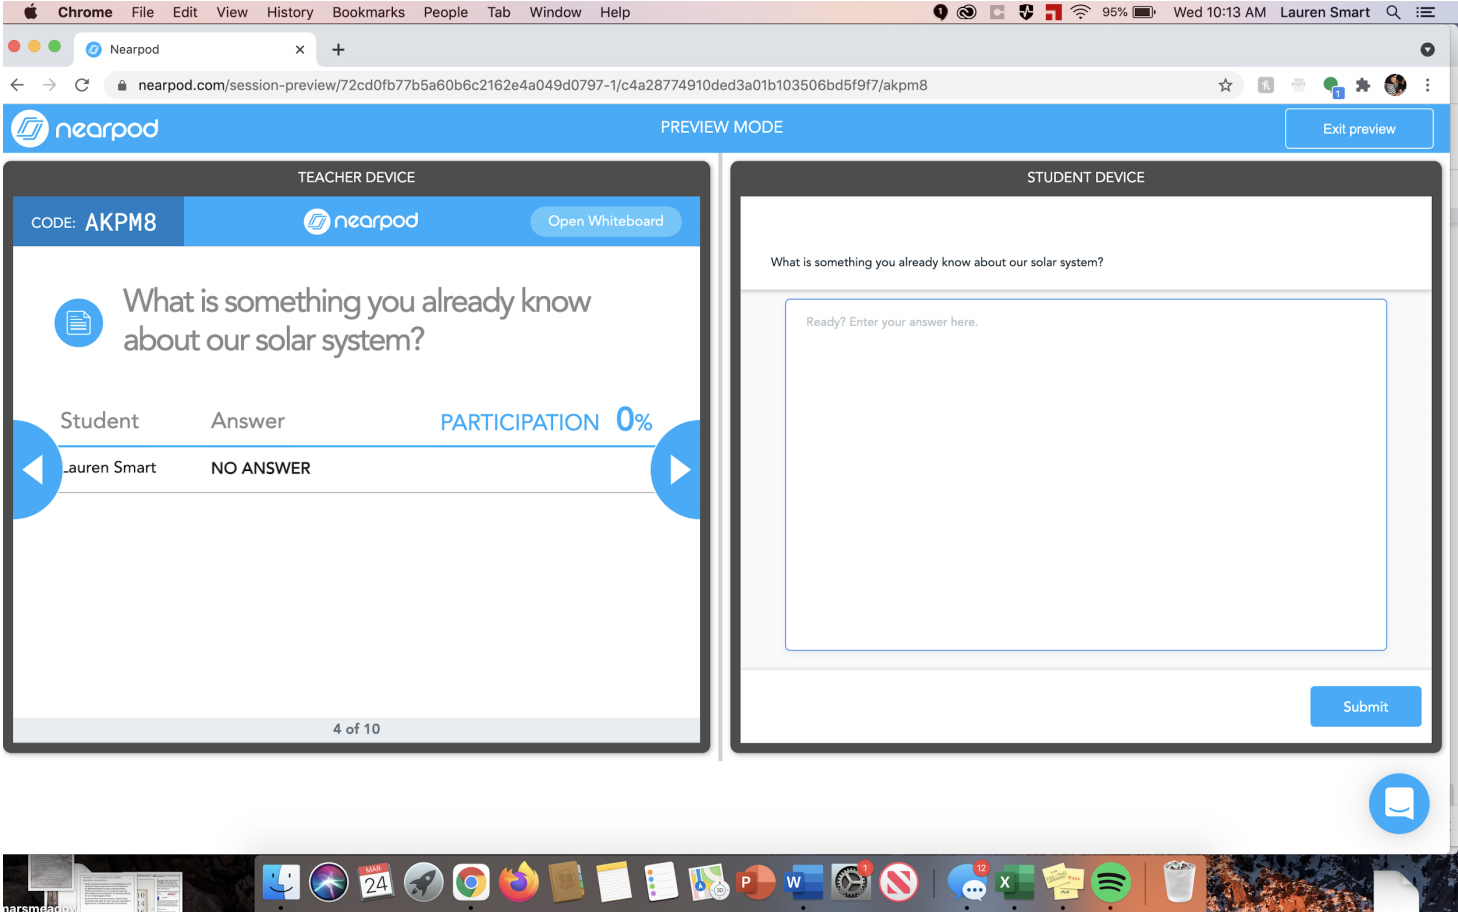
Nearpod is a tool that allows you to easily build slideshows that include real-time engagement for the students. It has several built in features, like real-time questions to which students can submit answers, a whiteboard feature and an exit quiz. It’s important to note that this tool was originally designed for K-12 classrooms, so it can feel childish or rudimentary. But for those of us who don’t require videos on during Zoom classrooms, or want to make sure students are still paying attention, it’s a quick, easy way to present a slideshow, while also monitoring digital presence.
How is it being used here?
Background and context: This is a tool that I use in my introductory reporting class, as a supplement to the Zoom call. Primarily, I use its exit quiz feature after a lecture on a particular aspect of journalism or reporting. It allows me to re-emphasize an aspect of the class. Throughout the semester, those exit quiz answers add up to the participation grade for remote students. If you are teaching asynchronously, this is a particularly interesting tool, because you can incorporate videos into the presentations. You could chop your lectures into shorter sections, followed up by quizzes to monitor engagement. You can also add in videos from YouTube or other sources.
Learning outcomes and/or benefits:
- Monitor attendance/ participation in a lecture without adding Zoom stress to faculty/students. Particularly helpful in large classrooms.
- Useful platform for low-stakes pop quizzes. (Would have to transfer any grades into Canvas.)
- Interactive presentations in synchronous or asynchronous classrooms. Demonstration: You can build a quiz page into your slideshow that looks like this:
How can I get it?
It’s free for teachers at nearpod.com. Students access it from an access code that you send them. (I drop it in the Zoom chat when using.)